Monday, November 28, 2005

MOQUECA DE PEIXE

Brazil, the largest country in South America, is well-known for it’s extraordinary multi-ethnic and multifaceted culinary diversity resulting from a colonial past and a melting pot of influences originating from it’s immigrants who hailed from all over the world.

The base of Brazilian cuisine comes from the Native Indians with foods like cassava, yams, corn, roots, fish and game. When the Portuguese conquerors colonized Brazil in 1533, they brought with them their own cooking traditions (seafood dishes) which were already influenced by the Moorish (North African) occupation of Portugal during the 8th century AC. In 1538, around 5 million African (mostly West Africans) slaves arrived, thus importing their own flavors (foods including pineapple, coconut, palm hearts, etc...) that still remain as being the largest and predominating culinary influence of Brazil. Besides, the immense flow of immigrants (Western and Eastern Europeans, Arabs and Asians) who came between the end of the 19th century and the beginning of the 20th century also participated to widening the range of influences that have been absorbed by Brazil’s richly original cuisine.

It is important to know that, unlike other South American countries, Brazil has highly tasty dishes which are playfully sweet, but rarely wildly hot; they are harmonious and delightfully perfumed. Brazilian food tends more to rafinement rather than to inducing an electrocuting and fiery clash of overwhelming sensations!

Brazil's national cuisine has to be seen like a collection of five main regional styles and methods of cooking. The North is heavily influenced by the Native Indians, the Northeast is pedominated by African cuisine, the Central-West is an agricultural region with lots of ranches, fishes and game, the Southeast has a big European and North African cooking tradition and The South's diet comes from the gaucho (cowboy), German and Italian people.

Brazil’s sensual and mystique aura is captured within this typical Afro-Bahian dish named “MOQUECA DE PEIXE”. It is voluptuously spiced and delicately perfumed. “MOQUECA” is a concentration of what Brazil has to offer: beautiful sweet flavors tinted by the exotic savor of tropical islands. This speciality is so heavenly and colourful that it will wonderfully play with your taste buds which will be delightfully tingled!!!

~ Moqueca Da Peixe ~
Recipe by Rosa @ Rosa's Yummy Yums 2005.

Quantity for 3-4 people.


Ingredients:
500g Cod fillets, cut in 2cm cubes
200g Big shrimps (optional)
2 Big white onions, chopped
3 Cloves garlic, crushed
1 Jalapeño chilli, seeded and chopped
4 Tomatoes, coarsly chopped
4Tbs Fish sauce
2 Limes, juiced
2 Green peppers, seeded and cut in strips
1 Big onion, sliced
400ml Coconut milk
1Tbs Olive oil
1Tbs Dende oil
Salt to taste
Pepper to taste

Method:
1. Mix together garlic, pepper, salt and lime juice.
2. Pour over fish and shrimps, and marinade for 1 hour.
3. In a food processor, combine onions, jalapeño chilli, tomatoes, dende oil and fish sauce.
4. Heat a frying pan, add oil and sliced onions. Fry until translucid.
5. Add the green peppers and stir-fry for about about 3 minutes.
6. Add the fish and shrimps, and pour the tomatoe mixture into the pan. Cook for about 5 minutes.
7. Pour the coconut milk into the fish mixture.
8. Salt and pepper to taste.
9. Simmer for 40 minutes to 1 hour until sauce has thickend. Serve.

Remarks:
Dende oil, or palm tree oil, may be difficult to purchase if you don’t have a Carribean market near your house, so you can replace it with olive oil although it’s flavor will be different.
You can either simmer the “MOQUECA” in a normal pan or in a clay pot placed in a moderate oven, thus being careful that the stew doesn’t dry too much or burn.

Serving suggestions:
Eat this dish with farofa (fried manioc flour) or plain white rice (Carolina, parboiled, etc…).

Decorate the "MOQUECA" with chopped coriander and .

(Moqueca -Pic by Rosa www.rosas-yummy-yums.blogspot.com)
(Salvador De Bahia -Pic by Christian Cooper
www.trekearth.com)
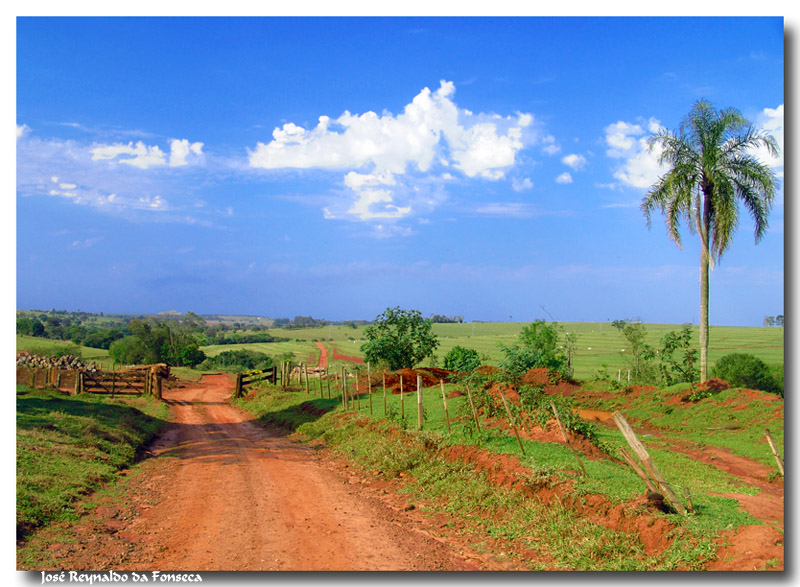
(Southeast Brazil -Pic by Jose Reynaldo Da Fonseca
www.trekearth.com)

Sunday, November 27, 2005

ELLE À TABLE

For the neophytes who don’t know what ELLE À TABLE is, this magazine deals with everything in close relationship to food in a gastronomical sense. It was firstly released in 1995 in Sweden and was very fastly printed for distribution in diverse other countries like France, Germany, Australia, Japan and Italy. ELLE À TABLE is a lifestyle magazine in association with the trademark ELLE.

ELLE À TABLE is directed to people who are in search of a fresh and innovative magazine dedicated to a specific fashionable and socially rich way of life. This bimonthly magazine has a modern and fresh manner of speaking about the table arts.


The articles are very witty and humorful, thus adding a unique zesty touch to the magazine's remarkable writing. ELLE À TABLE is packed with tons of interesting and captivating columns, highly aesthetic photography and finger-licking recipes. Inside each issue, you’ll find shopping news, wine and book reviews, articles about interior decoration and food-loving people, suggestions, useful addresses of restaurants and stores, internet tips and so much more. The dishes presented are either simple, traditional or elaborate depending on the event and mood/context chosen. There are recipes by chefs and delicious menu ideas to experience with friends.

ELLE À TABLE compiles a lot within it’s classy magazine; there’s so much to read and cook that you’ll not see the time pass until the next issue comes out! It is a truely beautiful little culinary jewel to recommend to anybody who appreciates the value of good food.

I’ve been an avid ELLE À TABLE reader since a time now and this cookery magazine continues to overwhelm me with it’s magnificent contents! This luxurious gourmet magazine is a very interesting read and a real pleasure for the eyes. It’s joyful and colourful tone is very seducing and the open-mindedness of it's collaborators will enlighten you!!!

(Elle à Table -Pic by www.elle.fr)

Saturday, November 26, 2005

CHICKPEAS (CICER ARIETINUM)

Whilst some people dislike chickpeas, I always loved them for their mild nutty and creamy taste as well as for their crunchy and pleasant floury texture. I also enjoy the wide ranging variety of dishes which can be made with this humble seed…

Chickpeas are generally round in shape and either black, reddish, brown or pale yellow in colour. Also known as chana, garbanzo bean, Bengal gram or ceci bean, this seed is a member of the pulse family and originates from Southern Europe and the Middle East. Chickpeas grow on 20-50cm bushes which have small feathery leaves. Although chickpeas need a subtropical or tropical climate, because the plants need a lot of rain (400mm annual rain), they are also quite resistant to cold temperatures. Chickpeas can be grown in a temperate climate, but the production will then be lower. They are produced from the Mediterranean to Western Asia. Did you know that they were even cultivated in Germany, during WWII, as a substitute to coffee?!!! Interesting, isn’t it?….
Before they can be cooked, chickpeas have to be previously soaked for about 8 good hours in water, but they can also be germinated and then, eaten raw. Because of it’s essential nutrients and undeniable source of protein, this pulse holds a major role and importance within many culinary traditions of many cultures in places like India, Spain, Greece, North Africa, Lebanon, etc… What would a couscous, a hummus, raitas, felafels or a chhole be without this rich and nourishing staple?!? Many appreciated and renowned specialities would simply not exist without chickpeas. Just imagine what we would come to miss!...

Chickpeas are magical as they can be curried, spiced, stewed, mashed, pureed or ground (flour); one can nearly do what she/he wants with them! And apart from their obvious utility, chickpeas taste very fine (yes, yes…) and bring an uncomparably round hazelnutty/chestnutty flavor and a “smoky” note to dishes….


(Chickpeas -Pic by
www.kristinreisinger.com)
(Chickpea Harvest -Pic by www.christianaid.org.uk)

CHHOLE

Pulses (sixty varities) are an important part of India’s diet and chickpeas are well-represented within the culinary tradition of this colourful country.

“CHHOLE” is a delicate and succulent dish from Punjab (Northern India) that is found at all wedding banquets. It is a tasty speciality which’s savor is enrichened by many spices and, in particular, by a very special one called asafoetida* (Ferula Asafoetida aka Devil’s Dung!!!). This spice is commonly used in India and although it smells and tastes rather foul (rotten eggs), it adds more character to dishes when associated to other ingredients.

This recipe was taken from Monisha Bharadwaj’s beautiful cookbook entitled “The Indian Kitchen” and was slightly modified by myself.

Serves 4

Ingredients:
300g Dried white chickpeas
1 Pinch soda
90ml Sunflower oil
1 Tsp Cumin seeds
1/2 Tsp Asa-foetida
3 White onions, chopped
1 Tsp Ginger paste
1 Tsp Garlic paste
10g Green chillies, seeded and sliced
150g Tomatoes, chopped
1 Tsp Ground chilli (optional)
1 Tsp Turmeric powder
1 Tsp Mango powder (or 2Tsp mango chutney)
1 Tsp Garam masala
1 Tsp Ground anardana seeds (pomegranate seeds)
300-400ml Water
Salt to taste
60g Fresh Coriander, chopped
1 Lemon quartered

Method:
1. Soak the chickpeas in water overnight. Sieve and put in a pan with soda and enough fresh water. Cook until tender.
2. In a frying pan, heat the oil and add the cumin seeds and asafoetida. Fry for about 1 minute.
3. Add the onions, the green chillies, the garlic and ginger paste. Fry until the onions are translucid.
4. Add the tomatoes and cook for about 5 minutes while stirring and crushing them in order to obtain a type of paste. Add the chilli powder, turmeric, mango powder, garam masala and pomegranate seeds.
5. Continue stirring until the paste gets brownish in colour, then add the chickpeas. Stir.
6. Pour in the water and salt to taste.
7. Crush a few chickpeas in order to thicken the sauce and let simmer for about 10-15 minutes.
8. Serve sprinkled with coriander and accompanied by one quarter lemon per person.

Remarks:
If you don’t have any garlic or ginger paste underhand, pound the garlic and ginger in a mortar.
Don’t worry if you don’t find pomegranate seeds, they can be optional.The “CHHOLE” has to be thickish and not too watery.

Serving suggestions:
Eat with basmati rice, popadums or naan bread.

* Asafoetida: Powdered resin gum coming from the stem and roots' dried sap of a variety of wild fennel.

(Chhole -Pic By Rosa www.rosas-yummy-yums.blogspot.com)
(Punjab -Pic by Amihay Shraga www.trekearth.com)

Wednesday, November 23, 2005

Tuesday, November 22, 2005

THANKSGIVING PUMPKIN PIE

Firstly, I wish a HAPPY THANKSGIVING to all the American bloggers who live in the US and abroad; may you enjoy this very special day and eat wonderfully well!

I must confess that I had never been a big fan of pumpkin tarts or pies until the day I discovered the American way of baking luscious desserts with this intreguingly remarkable and manifold fruit. Now, I am addicted to it and can’t stop looking around for new recipes which I put to the test in my little kitchen!

On that occasion (Thanksgiving), I’ve decided to share with you my “PUMPKIN PIE” recipe. This typical all-time classic of American cuisine is THE incontrovertible fall desserts served on this national day of feasting. “PUMPKIN PIE” is perfect to celebrate Thanksgiving with it’s comforting autumnal flavors and spices which are mind-blowingly blended together. This pie is full of finesse, yet chock-full of taste and unpretencious, not too sweet nor sickly, but just flawlessly wonderful and well-balanced. It is the best conclusion to a complete and festive traditional Thanksgiving menu!…

This recipe which I have partially adapted was originally released within the pages of R. Danforth, P. Feierabend and G. Chassman’s great “Culinaria USA” book, a gastronomical and cultural bible printed by the defunct Könemann publisher.


Ingredients:
Enough "Shortcrust Pastry" (or shortbread pastry) for one 23cm pie*
Filling:
3 Eggs (~53g)
1 2/3 Cup Pureed pumpkin (butternut squash or pie/sugar pumpkin)
125ml Maple syrup
250ml Double (thick) cream
2 Tbs Unsalted butter, melted
2 Tbs Dark rum
2-3 Tbs Castor sugar
2 Tbs Cornstarch
2 Tsps Ground cinnamon
1 Tsp Ground ginger
1/4 Tsp Ground nutmeg
1/4 Tsp Ground allspice
A pinch Ground cloves
1/3 Tsp Salt

Method:
1. Preheat the oven to 210°C (410°F).
2. In a bowl, beat the eggs with the pureed pumpkin, then add the maple syrup, cream, melted butter, rum, sugar, cornstarch, ground cinnamon, ground ginger, ground nutmeg, ground allspice, ground cloves and salt.
3. Roll out the shortcrust pastry and line the pie dish or flan case. Trim off excess edge.
4. Prick the bottom of the pastry with a fork.
5. Pour the filling into the pastry case and bake for about 35-40 minutes.
6. Eat once it is cool.

Remarks:
While preparing the filling you can taste it in order to see if you want the pumpkin mixture a little sweeter. If it’s the case add some sugar. But, normally, this filling needs no added sugar.
Instead of maple syrup you can use either light runny honey, golden syrup or corn syrup, but be careful, because they all have a different sugar potency.
Do not to let the pie crust get too brown. If it has a tendency to burn, then lower the oven heat to 180° C (350°F) after the pie has baked for about 15-25 minutes at 210°C (410°F).
If you use "Shortbread Pastry", you'll have to bake it blind before you can pour the filling into the pastry case.

Serving suggestions:
Eat with whipped cream.

*See "Shortcrust Pastry" recipe on this blog.

(Pumpkin Pie -Pic by www.rickdeesinthemorning.com)
(Pumpkin Pie -Pic by Rosa www.rosas-yummy-yums.blogspot.com)
(Pumpkins -Pic by
www.pismire.org)
(Leaves -Pic by
www.fishhook.ndsu.edu)

Sunday, November 20, 2005

MOIST ORANGE SYRUP CAKE

Citrusy tasting food has always caught my attention, but until now I never really baked anything with oranges (don’t ask me why…), so I thought that I would remediate to this deplorable situation by making this delicious cake!
Basically, this recipe is not too different from it’s close cousin the lemon syrup cake, but taste-wise it has not much in common although both are made with citrus fruits.


If you like moist syrupy cakes, then this one’s for you! It is humid and spongy to please and really tasteful. The recipe is maybe very simple and basic, but the end result is really fantastic. The orange rind brings a bitter and yet almost caramelly flavor to this cake and the syrup adds a little sourness (very light, though) to it’s mellowness. This orange cake is delicately perfumed and is the ideal accompaniment to a good cup of tea!...

This recipe is based upon that from The Australian Women’s Weekly “Quick-Mix Cakes” book and was freely modified and adapted by myself.

Ingredients:
Batter:
90g Unsalted butter
165g Castor sugar
180ml Milk
1Tbs Orange rind, grated
1 Egg (~50g)
225g Plain white flour
1 1/2 Tsp Baking powder
1Tsp Vanilla extract
Syrup:
70ml Orange juice (or 90ml if you only use orange juice)
20ml Lemon juice
85g Castor sugar


Method:
1. Preheat oven at 180°C (350°F) and put a rack in the middle of the oven.
2. In a bowl, put the sugar, orange rind and vanilla extract together with the butter.

3. Cream the mixture until light and fluffy.
4. Add the egg, beating well until totally incorporated.
5. Fold in sifled flour (with the baking powder) and milk gradually. Stir until well combined.
6. Pour the batter into prepared rectangular or round cake tin.
7. Bake for about 45 minutes or until skewer comes out clean when pushed into the thickiest part of the cake.
8. Stand for about 5 minutes.
9. Meanwhile mixt together the sugar, orange juice and lemon juice. Stir over heat until sugar is dissolved. Bring to boil and remove from heat.
10. Once the 5 minutes have passed, pour syrup evenly over hot cake.
11. Let the cake cool before eating.

Remarks:
Be careful not to grate the rind down to the white inner skin as it is bitter.
If you wish, you can only use orange juice for the syrup.

Serving suggestions:
Eat at any time of the day with tea or coffee.


(Syrup Cake -Pic by www.mkweb.co.uk)
(Moist Orange Syrup Cake -Pic by Rosa www.rosas-yummy-yums.blogspot.com)

(Oranges -Pic by
www.abc.net)

EKMEK BREAD

„EKMEK“ or ordinary white bread is a speciality which is eaten on a daily basis in it's native Turkey. It comes in various shapes (plait, flat, ring, etc…) and with many different toppings (sesame or poppy seeds, egg-glaze, olive oil-glaze, etc…).


In Turkey, bread is the foundation of every meal and it holds an important place in people’s lives. Baking is seen as a divine art; Adam who has learnt how to make bread from the Archangel Gabriel is the Patron Saint of bakers. It is then natural to find bakeries in every neighborhood so that the blessed food can be supplied to every family.

“EKMEK” is a light and soft olive oil-enrichened bread very much like it’s Italian cousin “Foccacia”.


With this recipe, I’m sure sure that all of you, unconditional bread lovers, will enjoy the unique taste of “EKMEK BREAD” as if you were in Turkey!…

The following recipe was taken and adapted from Eric Treuille and Ursula Ferrigno’s “Ultimate Bread” (see review).

Makes one loaf

Ingredients:
1 Tsp Light runny honey
300ml Water, tepid
2 Tsp dried yeast
500g Strong or plain white flour
1 1/2 Tsp Salt
2 Tbs Virgin olive oil, plus extra to coat and glaze

Method:
1. Stir the honey into 150ml of the water in a bowl, then sprinkle in the yeast. Leave for 5 minutes, then stir to dissolve. Mix the flour and salt together in a large bowl. Make a well in the centre and pour in the yeasted liquid.
2. Use a wooden spoon to draw enough of the flour into the yeasted water to form a soft paste. Cover the bowl with a tea towel, then leave to “sponge” until frothy and risen, about 20 minutes.
3. Pour the remaining water, holding back about half, and the olive oil into the well. Mix in the flour. Stir in the reserved water, as needed, to form a firm, moist dough.
4. Turn the dough out on to a lightly floured work surface. Knead until smooth, shiny and elastic, about 10 minutes.
5. Put the dough in a well-oiled bowl, turning it to coat evenly with the oil; cover with a tea towel. Leave to rise until doubled in size, about 1 1/2 - 2 hours. Knock back, then leave to rest for 10 minutes.
6. On a lightly floured work surface, use your hands to flatten the dough into a round, 23cm (9in) across and 2.5cm (1in) thick. Place on a floured baking sheet and cover with a tea towel. Leave to prove until doubled in size, about 45 minutes.
7. Brush the dough with olive oil. Use the blunt edge of a knife to make four parallel indentations across the dough, then four more indentations in the opposite direction to make a criss-cross pattern, leaving a 2.5cm (1in) border around the edge.
8. Bake at 220°C (425°F) in the preheated oven for 40 minutes until golden and hollow-sounding when tapped underneath. Sprinkle with extra oil, then leave to cool on a wire rack.


Remarks:
If you shape the dough in order to make 11cm (4.5in) diameter buns, then those breads will be perfect "Hamburger Buns".
The flattened bread is the most spread way “Ekmek” is presented. It has checkboard cuts on it’s top and is brushed with olive oil previous to it’s baking.

Serving suggestions:
Eat “Ekmek” as a main course with “Baba Ganoush”*, “Hummus”*, cheese (especially Feta) or for the breakfast with jam and any spread of your choice. You can also eat it as an accompaniment to meat stews.


*Those recipes can also be found on this blog.

(Plaited Ekmek Bread -Pic by Rosa www.rosas-yummy-yums.blogspot.com)
(Suleymaniye Mosque, Istanbul -Pic by Hakan Guney www.trekearth.com)
(Flat Ekmek Bread -Pic by www.muratun.com.tr)

CAT FUN #2

Cat Prayer
"Now I lay me down to sleep, I pray this cushy life to keep. I pray for toys that look like mice, and sofa cushions, soft and nice. I pray for gourmet kitty snacks, and someone nice to scratch my back, for windowsills all warm and bright, for shadows to explore at night. I pray I'll always stay real cool and keep the secret feline rule to never tell a human that the world is really ruled by cats!"
Author Unknown

(God -Pic by www.scarlettini.nl)

(Cat And Mouse -Pic by www.digitaldreamdoor.com)

Friday, November 18, 2005

CHOCOLATE HEAVEN

Have taste of this, it's new and asolutely de-li-cious!!!

In the revolutionary world of chocolate making, the various manufacturers can't stop competing for the monopoly position on the market and that with neverending extravagant ideas. And with this chocolate, a new gap has been discovered as until now, I had not seen any chocolate of this kind. My guess is that their new line of chocolates will be very successful!!!...

What's so different from other chocolates, you'll ask me... Well,
Camille Bloch's last creation to date is a little more sophisticated than your usual commercial chocolate as this one has a mousse filling within it's centre. And this special variety of chocolate comes in four different types of delicate flavors: chocolat (chocolate), chocolat noir (dark chocolate), caramel and noisette (hazelnut).

Those chocolates are filled with an unctuous and airy mousse which will remind you of the best homemade desserts you've eaten. The chocolate itself is not too sweet and has a fine full taste of cocoa. And that's exactly what makes this mousse collection very pleasant. One has to enjoy those chocolates without any guilt as it would be a pity to spoil this pure moment of bliss with such negative feelings!!!

If anybody can ever get a grip on those delicious chocolates, then I recommend you to run as fastly as possible in order to immediately buy Camille Bloch's heavenly Swiss milk creations!!! Paradise will then only be a step away from you...

A bit of history:
The Camille Bloch company was founded in 1929 in Berne, the capital of Switzerland. During the Second World War, one of the most successful products which brought the founder to the top was his delicious creation called Ragusa.

Because of the shortage of ingedients, he decided to invent a hazelnut praliné-paste which was added to the chocolate mass. In the 70's, other renowned and innovative chocolates like Torino branche, Kirsch-Li and Ragusa Jubilé saw the light of day with as much success as it's predecessor Ragusa and have never stopped being chocolates of reference.

Since then, the company has continued producing quality Swiss chocolate and creating new and original products in order to perpetuate the Swiss chocolate history for our biggest gustative pleasure!...

(Camille Bloch Chocolate -Pic by www.camillebloch.ch)

Wednesday, November 16, 2005

FAST FOOD

Have you ever wondered what "fast food" really means?!?!?!!!
(Fast Food Fun -Pic by www.buffalosjokes.com)

Monday, November 14, 2005

FOOD FOR THOUGHTS

"Food, like a loving touch or a glimpse of divine power, has the ability to comfort."
Norman Kolpas

"Food isn't about impressing people. It's about making them comfortable."
Ina Garten, "The Barefoot Contessa Cookbook"

"After a good dinner, one can forgive anybody, even one's own relations."

Oscar Wilde

(Painting -Pic by www.foodfortalks.com)

Sunday, November 13, 2005

RECIPE BOOK REVIEW #1

"ULTIMATE BREAD" by Eric Treuille & Ursula Ferrigno
168 pages, Dorling Kindersley

"Ultimate Bread" is a collaboration between the French Eric Treuille and the Italian Ursula Ferrigno. Both authors share unforgetable family memories in relation to bakery as they were privileged for having had their first experience in making bread very early. It was their love of bread which propelled them into baking bread at home and then teaching others how to do the same. Eric Treuille and Ursula Ferrigno believe that your whole life changes when you take the time to bake at home, and you'll find out that they are not wrong at all…

The result of their efforts is contained in this great book through which their enthusiasm and passion for home bakery is communicated to the reader who will be inspired and will run straight to the kitchen to start baking!!! "Ultimate Bread" comprises over 100 accessible bread recipes from all around the world (Europe, America, India, Middle East, British, French, Italian, etc...) with easy-to-follow and detailed instructions and beautiful photography.


The first 60 pages are dedicated to a thourough introduction to the fundementals of bread making, with lots of helpful informations about tools and equipment, various ingredients and basic techniques. The book has different chapters depending on bread types: basic breads, breads using starters, flavored breads, enriched breads, flat breads, quick breads, festive breads and recipes using bread. Each section is chock-full of superb and well-detailed recipes including inserts with short cultural descriptions about each bread.

I really find this book very useful and practical. "Ultimate Bread" is a complete guide to the art of bread making which comes in very handy everytime you decide to bake any bread whether it is included in this book or not. Their great methods and tips contained within the pages of this book can be applied to all the breads you want to make. You'll see that with them, no bread will ever fail; in fact, you will always be totally successful in your baking! "Ultimate Bread" is a real "bible" and guideline which makes you want to explore unknown recipes without feeling any apprehension; your sense of adventurousness will be stimulated. You will soon discover that you can’t live without it's precious help and contimuous presence at your side!

All the recipes I’ve tried so far were delicious and turned out exactly as on the pictures. Some of my fave recipes include the following breads: Baguette, Bagels, Pretzels, Ciabatta, Swiss Zopf, Parker House Rolls, Ekmek, Barbari, Pide, Corn Bread, Challah, etc.. And you’ll also find other interesting recipes like Victorian Milk Bread, Broa, Pumpkin Bread, Dark Chocolate Bread, Stromboli, Brioche, Cinnamon Raisin Bread, Naan, Pita, Dresdner Christstollen, Bolo-Rei, Panettone and many more.

"Ultimate Bread" doesn’t lie and you’ll be delighted by it’s genuinety… It's one of the best books around when it comes to bread making, so grab your copy now!


Buy this book from
www.amazon.com

BANANA AND CHOCOLATE CAKE

There’s a whole lot of recipes which can be made with bananas. Cakes or breads are one of my favorite way of using this exotically perfumed fruit which has since long been integrated to our culinary habits and customs.

The gorgeous and bewitching aroma of bananas is perfectly blended together with the deep roundness of cocoa/chocolate in order to offer you this harmonious and flavorful cake.

This “BANANAS AND CHOCOLATE CAKE” is very fluffy, moist and delightfully aromatized by the bananas. And I really love it’s final warm taste of chocolate which adds even more character and soul to this cake.… May you be enthralled by it's lusciousness!!!

This recipe originally comes from the website www.southernfood.about.com. It was adapted and perfected by myself.


Ingredients:
125g Unsalted butter
270g Caster sugar or light brown sugar
2 Eggs (~50g)
300g Plain white flour
½ Tsp Baking soda
1 ¼ Tsp Baking powder
A pinch salt
½ Tsp Vanilla extract
4 Cubes dark cooking chocolate (min. 44 % cocoa), melted and cooled
3 Ripe bananas, mashed
3 Tsp Cocoa
1 Tbs Dark rum (optional)

Method:
1. Preheat the oven on 180°C (350°F).
2. Mix together the flour, baking powder, soda and salt in a recipent.
3. In a bowl cream the butter with the sugar and vanilla extract.
4. Add the eggs, one at a time, into the butter mixture and mix well until blended.
5. Add the melted chocolate and stir well.
6. Sieve the flour mixture into the batter alternately with the mashed bananas until it is perfectly smooth.
7. Add the sieved cocoa and the rum.
8. Pour the batter into a greased cake tin of your choice and bake for about 40 minutes, until a thin skewer comes out free from the mixture when inserted into the thickest part of the cake.

Remarks:
When you add the eggs, beat thouroughly in order to get a smooth mixture.
If the batter is too thick, then add a little milk to it, but normally it should be wet enough.


Serving suggestions:
You can frost the cake with "CHOCOLATE FUDGE FROSTING" if you wish. I ate it without frosting and it was very fine and tasty.

CHOCOLATE FUDGE FROSTING
According to The Australian Women’s Weekly “Quick-mix cakes” book.

Ingredients:
45g Unsalted butter
2 Tbs Water
55g Caster sugar
120g Icing sugar
2 Tbs Cocoa

Method:

1. Combine the butter, water and caster sugar in a small saucepan, stir over heat without boiling, until sugar is dissolved.
2. Sift the icing sugar and cocoa into small heatproof bowl and gradually stir in hot butter mixture.
3. Cover and refregerate until thick.
4. Beat with wooden spoon until it is smooth and spreadable.

(Banana Chocolate Cake -Pic by www.rootsofcompassion.org)
(Banana Chocolate Cake -Pic by Rosa www.rosas-yummy-yums.blogspot.com)

(Chocolate -Pic by www.ucdavis.edu)
(Bananas -Pic by www.baycriscuisine.com)

Saturday, November 12, 2005

GREEK FETA ROLLS (BOUREKAKIA APO TIRI)

The Greeks (like the Turks) are renowned for their big variety of "mezethakia" (the Greek equivalent of mezze) which are generally accompanied by ouzo (sweet anise-flavored liqueur) or retsina (traditional Greek white wine treated with pine-tree resin).

Greek specialities are the testimony of an archaic, but highly developped gastronomical tradition old of 25 centuries that has crossed the ages thanks to the women who perpetuated their art through their daughter and over many generations...

These delicious "FETA ROLLS" will ravish any gourmet whether they are served as a starter or as a main dish. You'll simply love them as they are easy to prepare and are very satisfying taste-wise!

I've adapted many different recipes according to my taste and what I believe is genuinely Greek in order to end up with this personal recipe which I hope you'll find interesting...

Serves 6 people when presented as a starter or 3-4 people when eaten as the main dish.
Ingredients:
200g Feta cheese
100g Kefalotiri* or parmesan cheese, grated
200g Quark (full or half fat cream cheese)
2 Eggs (~50g)
2 Tbs Cornstarch
2X 100g Unsalted butter, melted

A pinch dry or fresh oregano
A pinch nutmeg
Pepper to taste
Salt to taste
3 Tbs Fresh parsley, chopped
12 Pieces brick pastry (or enough phyllo pastry to make 12 rolls)

Method:
1. Preheat oven at 200°C (or 400°F).
2. In a bowl, crumble up the feta cheese.

3. Add the grated kefaltori or parmesan cheese and the quark.
4. Break in eggs, incorporate the cornstarch, the oregano, nutmeg, pepper, salt, one part of the melted butter and chopped parsley. Mix well.
5. Place about 2 tablespoons cheese mixture on a corner end of the brick pastry. Fold bottom brick pastry over filling, fold in sides, brush the end part with a thick mixture of water and flour and roll over to enclose it’s contents.

6. Brush the rolls with the remaining melted butter.
7. Place rolls on a baking tray and bake for about 15 to 20 minutes or until golden brown.
8. Once they are cooked, slightly cool them and serve warm.


Remarks:
Note that I have decided to use brick pastry (a thin North-Africam wheat pastry very similar to phyllo pastry) instead of Greek phyllo pastry.
If using phyllo pastry, follow the same rolling instructions eventhough the sheets might be rectangular. Remember that phyllo pastry is very delicate and has a tendency to dry very fastly, so I recommend that you pile the rolls up and cover them with a humid cloth.
You can freeze those rolls if you wish.

Serving suggestions:
Serve alone or with a salad.
Best made just before serving.

Eat while still warm.

* Kefalotiri:
A very hard cheese from Greece which has small irregular holes and is pale yellow. It’s made from goat’s or sheep’s milk. It’s got a strong, very salty, piquant and sharp aroma which makes it similar to parmesan cheese (kefalotiri is milder, but saltier). Kefalotiri is generally used grated on top of cooked dishes, salads or pastas. Being shaped like a head, it’s name is therefore derived from it’s shape (Kefal=head).


(Phyllo Rolls -Pic by www.dinnermates.co.za.jpg)
(Sparta -Pic by Nikolaos Sotirios Koumaris www.trekearth.com)

Friday, November 11, 2005

WEEKEND CAT BLOGGING #23

Welcome to WCB #23!

The lazy Fridolin and Maruschka taking the pose...

Due to Clare and Kiri's unfortunate accident, this weekend's WBC will be hosted by Boo_licious from Malaysia and Farmgirl from USA. If you also want to participate to Weekend Cat Blogging, then just leave your blog name, URL and permalink in a comment on their site.
I'm looking forward to seeing your cute kitties on either blogs!

(Maruschka And Fridolin -Pic by Rosa www.rosas-yummy-yums.blogspot.com)


Sunday, November 6, 2005

BANANA BREAD PUDDING

"BREAD AND BUTTER PUDDING" is a great and useful way to use leftover bread. There are so many different manners to adapt the basic traditional recipe that it's impossible to get tired of such a yummy dish.

"BREAD AND BUTTER PUDDING" can be made as a sweet or savory meal and is super fine eaten hot or cold, as a dessert, main course or for breakfast. The old-fashioned classic has been adapted and transformed over the years for our biggest pleasure and has now been accomodated to our modern gastronomical needs and tastes...

One day, I decided to invent a different version of "BREAD AND BUTTER PUDDING" as I had one single ripe banana desperately lying around and waiting to get eaten! I came up with this wonderfully aromatic and sinfully delicious "BANANA BREAD PUDDING". I really love it's springy and moist consistency which contrasts with it's golden crunchy top; simply de-li-cious! This is comfort food at it's best!!!

Makes a quantity for 2-3 people

Ingredients:
260g Stale white bread
4 Eggs (~50g)
5 Tbs Flour
150ml Double cream or thick cream
400ml + 150ml Milk
1 Ripe banana, mashed
8 Tbs Caster sugar
4 Tbs Light brown sugar (for topping)
3 Tbs Butter, melted
1 Lemon, zested
1/2 Tsp Ground cinnamon (+ more for the top)
A pinch ground cloves
1 1/2 Tbs Brown rum
4 Tbs Raisins, currants or sultanas (I prefer raisins)

Method:
1. Cut the bread in cubes. Wet with 150ml milk. Set aside.
2. Mix together the eggs, flour, cream, milk, mashed banana, caster sugar, butter, zest, cinnamon, cloves and rum.
3. Butter a rectangular pudding dish. Place the bread cubes in the dish and sprinkle with the raisins.
4. Pour the batter over the bread and gently press the bread down into the batter in order to soak it well and to shape the pudding.
5. Sprinkle the top with cinnamon and brown sugar.
6. Cook in Moderate oven (180°C or 350°F)for about 1 hour or until it is set and the top is crunchy.

Remarks:
You can use any French type of bread or brioche bread for this recipe.
Instead of raisins, you can also use dried cranberries.
Light brown sugar may replace the caster sugar.

Serving suggestions:
Sprinkle this pudding with powder sugar or dribble runny honey, light molasses or maple syrup over it.
Eat either hot or cold

(Bread And Butter Pudding -Pic by www.bakersfederation.org.uk)
(Banana Bread Pudding -Pic by Rosa www.rosas-yummy-yums.blogspot.com)

ACCADEMIA DEL SOLE

Here's a beautiful wine from Southern Italy, a so-called "New World" wine which I found really delightful. "ACCADEMIA DEL SOLE" is worth giving a try, therefore I recommend you to buy it as every drop of it is highly valuable...

Grape variety: Viognier
Producers: Cantine Calatrasi
Place: San Cipirello, Sicily
Country: Italy

With such a poetic name like "ACCADEMIA DEL SOLE" this wine has to be special, and that's exactly what characterizes this wine: personality and originality!

"ACCADEMIA DEL SOLE" is a richly flavored, full-bodied white wine which has a magnificent golden lemon colour and a complex structure with a lot of character. This wine is intensively packed with nutty aromas of peaches and pears. It has a persistent note of fruits which beautifully ends up on a delicately oaked aroma. "ACCADEMIA DEL SOLE" is quite sugary, spicy and refreshing.

"ACCADEMIA DEL SOLE" will fully develop it's subtlety with cheese, fish, seafood, exotic specialities, white meat and nutty dishes.

(Accademia Del Sole -Pic by www.calatrasi.it)

SWISS FONDUE

Attention cheese lovers from all around the planet, today I am happy to present you a big Swiss star: “FONDUE”!!!

We Swiss people share a few dishes/specialities with the French people from Savoie and "FONDUE" is one of those. But, what is different with our “FONDUE” is the use of Swiss cheeses like Gruyère and Vacherin Fribourgeois and ingredients like Kirsch…

“FONDUE” is a very convivial speciality which brings people together around a table in order to share a pleasant moment. And since all guests eat from the same pan, the act of sharing has an even bigger signification.

“FONDUE” is the perfect dish to eat with friends or with the family while having a good time, especially if the weather outside is grey and unfriendly; it's a great way to spend a winter evening.

This recipe comes directly from my family and was passed onto me. I hope you’ll appreciate eating “FONDUE” as much as I do!

~ Swiss Fondue ~
Recipe by Rosa @ Rosa's Yummy Yums

Makes a quantity for 2 people

Ingredients:
A 500g Loaf of bread, cut into cubes
500g Gruyère (or 300g strong Gruyère and 200g medium strong Gruyère), finely grated
200g Vacherin Fribourgeois, cut into 1cm cubes/pieces
50ml Kirsch
220ml White wine
1 ½ Tsp Cornstarch
2 Cloves garlic, crushed
Black pepper to taste

Method:
1. In a glass, mix the cornstarch with the Kirsch.
2. Put the grated Gruyère into a pan, add ground pepper and start cooking over low heat.
3. Add the garlic, Kirsch (with cornstarch) and half of the wine.
4. Mix and pound the cheese mixture for about 6 minutes over medium heat.
5. When the mixture starts to emit vapor and is completely melted, add the Vacherin Fribourgeois.
6. Pour in the other half of the wine very slowly.
7. Continue stirring well.
Once all the cheese has melted and that bubbles are appearing on the surface of the fondue, then transfer the pan onto the fondue burner and start eating.

Remarks:
Use a wooden spoon to stir the fondue (you can use a risotto spoon) and a heavy cast-iron pan (“caquelon”).
You’d better buy/make a hard crust bread which has a dense texture inside.
Plain flour bread is fine and whole wheat bread is ok as long as it’s not too dark.
It is better to use a one day old bread.
If you can’t find any Vacherin Fribourgeois cheese where you are, you can replace it by another creamy cheese or Swiss cheese (USA), Appenzeller or even Emmentaler.
Kirsch is a Swiss type of brandy made with cherries. You can replace it by another fruit distilled brandy.
If you don’t like your fondue to be too tasty/intense in flavor, then you’d better only take mild (semi-old) Gruyère, but if you like strong cheese flavors you can also vary the quantity of strong (old) Gruyère you use in the recipe.
If you wish, you can always add a little more wine or kirsch dependimg on how you like your fondue to taste.
When stirring the fondue, always do it with a certain vigor.
Be careful to heat the fondue enough, otherwise it will start becoming elastic and chewing-gummy.
Don’t be afraid to let it bubble as it’s a sign that it’s ready and hot enough.

Serving suggestions:
Dip the cubes of bread in the fondue (with the help of a fondue fork) and stir.
If you wish, you can also dip cut vegetables (ex. peppers).
Drink a dry white wine with the fondue. Ideally, it should be a Swiss wine (ex. Chasselas, Chardonnay, Pinot Gris or Pinot Blanc), but a white Bordeaux or any other dry white wine will also do fine.

A link to my "Fondue" post is featured on BlogHer (see here).

(Gruyère & Fondue -Pic by www.theworldwidegourmet.com)

(Chalet Under Snow -Pic by www.skimorgins.co.uk)

BASLER MEHLSUPPE

„BASLER MEHLSUPPE“ is a Swiss German flour soup originating from Basel (northern Switzerland). It is made with roasted flour which confers a nutty flavor and an original brownish colour to this soup. "BASLER MEHLSUPPE" is a very simple and humble dish, but it has it's own special taste and uniqueness which make it so fine.

Although it is a typical Swiss speciality, it seems that it is also made in Alsace (France) and that’s no wonder since both regions are geographically close to one another, thus sharing similar gastronomical particularities…

I recommend you to eat this soup during the winter when it’s cold outside, as it is very nourishing and quite rich.

I have compiled this recipe from many different recipes so that I would end up with my own personal one which corresponds the best to my taste. I do hope you’ll discover a new dish that'll rejoice your palate!…


Makes 4 servings

Ingredients:
5+1 Tbs Plain white flour
50g Unsalted butter
1 Onion, sliced, previously sauteed in a bit of butter and left aside
1-1,5l Chicken stock
100g Cheese, grated
Salt to taste
Pepper to taste
1 Handful bread, cubed and toasted (optional)
1 Tbs Parsley, chopped (optional)
1 Tbs Chives, chopped (optional)

Method:
1. Heat up a pan, melt the butter and add 5 tablespoons flour.
2. Roast the flour while continuously stirring until you obtain a brown roux.
3. Add the remaining tablespoon flour and stir briefly.
4. Take the pan away from the heat.
5. Add the sauteed onions and wet with the chicken stock.
6. Stir well with a whisk.
7. Put back over heat and bring to a boil while stirring with the whisk.
8. Simmer the soup, uncovered for about 40 minutes and stir occasionally.
9. Salt and pepper to taste.
10. Serve the soup.

Remarks:
Be careful not to overheat the pan and burn the flour.
There should be no lumps of flour in the soup.
The soup has to be thick and creamy.
The parsley, chives and toasted cubes of bread are optional.

Serving suggestions:
Serve the soup topped with the toasted bread and sprinkle with the parsley, chives and cheese.
For this recipe Gruyère, Appenzeller, Swiss cheese or even Emmentaler can be used.

(Mehlsupper -Pic by www.banti.net)

(Basel -Pic 1 & 2 by Ozzy-Dave www.myswitzerland.com)

Saturday, November 5, 2005

CAT FUN

Star Wars cat...
(Warrior Cat -Pic by www.violent.vg)

Since cats are nosey, remember to look in your refrigerator before you close the door...
(Cat In Refrigerator -Pic by www.rulingcatsanddogs.com)

A cat baking...
(Baking Cat -Pic by www.allposters.com)